How to use Polylang with Bricks
Polylang is a WordPress plugin designed to simplify the creation of multilingual websites.
With Polylang, you can write posts, custom post types, pages, create categories, and post tags in multiple languages.
In combination, Bricks and Polylang facilitate the design and management of multilingual websites.
After creating a page in your default language with Bricks, you can use Polylang to translate the page into any other language your website supports.
Setting up Polylang with Bricks
Section titled “Setting up Polylang with Bricks”Assuming you have Bricks installed and activated on your WordPress site, the next step is to set up Polylang. This guide applies to both the free version of Polylang and Polylang Pro.
To set up Polylang with Bricks, follow the steps below:
- In your WordPress dashboard, go to
Plugins > Add New. - Type “Polylang” into the search bar and press Enter.
- You’ll see the Polylang plugin in the search results. Click on
Install Now. - After the installation is complete, click
Activate. - Once activated, a new
Languagesmenu item appears on your WordPress dashboard. Visit it, and add the languages you want to support on your website.
For Polylang Pro users, the installation process is slightly different as the plugin needs to be downloaded from the Polylang website and uploaded to your WordPress site. You can refer to the official Polylang documentation for detailed instructions on installing Polylang Pro.
For detailed instructions on configuring Polylang’s settings, please refer to the official Polylang documentation.
Translating posts & pages
Section titled “Translating posts & pages”Translating your pages and posts using Polylang and Bricks is a straightforward process. Here are the steps:
- In your WordPress dashboard, navigate to the page or post you want to translate.
- On the right-hand side, you’ll see a “Languages” meta box (added by Polylang). This box displays your default language and other languages you’ve added.
- Under each language, you’ll see a ”+” button. Click this button to create a new translation for the selected language.
![]()
- This action will create a new page or post draft. You can now use Bricks to design your page or write your post in the new language.
- Once you’re done, click “Publish”. The translated page or post will automatically be linked to the original one.
For users of the free version of Polylang, the Yoast Duplicate Post plugin can be a good alternative. It allows you to duplicate a post or page, which you can then edit with the translation.
Make sure to enable the duplicator for the “My templates” post type under Settings > Duplicate post > Permissions. Assign the duplicate page to the correct language and link it back to the page you’ve cloned it from.
Please ensure you check the official Polylang documentationfor detailed instructions.
Translating components
Section titled “Translating components”Since Bricks 2.2-beta, you can now translate components with Polylang. All component strings are registered automatically, and you can translate them directly from the WordPress dashboard.
To translate component strings:
- Go to Languages > Translations.
- Search for the component string you want to translate.
- Add translations for each language your site supports and save.
Translating templates
Section titled “Translating templates”Translating templates in Bricks using Polylang is a similar process to translating standard pages or posts.
- From your WordPress dashboard, navigate to
Bricks > Templatesin your WordPress dashboard. - Choose the template you want to translate and assign a language to it in the “Languages” meta box.
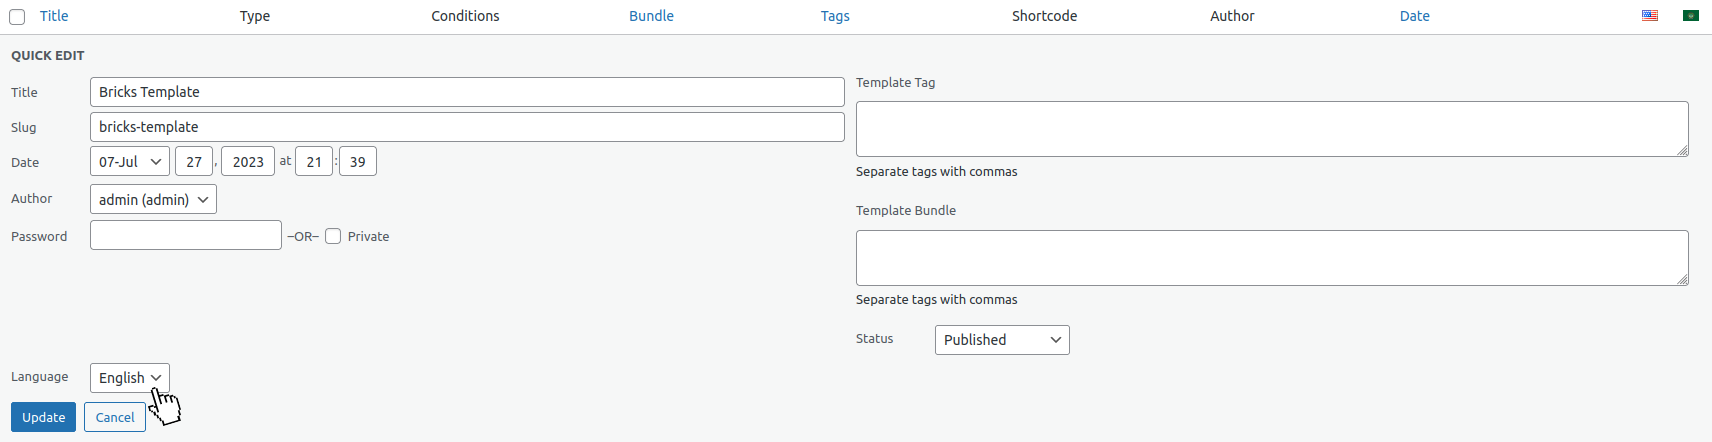
- Once the language is set, you can initiate the translation process as you would do with a standard post or page by clicking the ”+” button for the desired language in the Languages meta box.
![]()
- The newly translated template will be created in draft mode. At this point, you can modify the content and adapt it to the new language using Bricks.
![]()
Using templates conditions
Section titled “Using templates conditions”Bricks templates have template conditions that define where a particular template is rendered on your website. While these conditions offer flexibility, using them with Polylang introduces complexities due to how Polylang handles languages as WordPress taxonomy terms.
Although you can select language terms in Bricks conditions, it’s generally not recommended because of potential unexpected bugs. This is due to Polylang creating distinct posts or pages for each language, which are separate entities linked by the plugin.
Due to backward compatibility, these language terms are available in the conditionals but may not behave as expected.
Managing multilingual menus
Section titled “Managing multilingual menus”Polylang’s method for handling menu translations involves creating a separate menu for each language. To do so, you should follow these steps:
- Go to
Appearance > Menusin your WordPress dashboard. - Click
Create a new menu. - Give your menu a name, ideally including the language for easy identification.
- Choose the display location for this menu, then click
Create Menu. - (Optional) Use the admin language option in the admin bar at the top of the screen to match the menu language. This ensures the pages listed are in the selected language, helping you add the correct content.
- Start adding the pages, posts, categories, or custom links this menu will contain.
- Repeat these steps for each language your website supports.
For more details, please refer to the Polylang documentation: https://polylang.pro/doc/create-menus/.
The language switcher
Section titled “The language switcher”Bricks provides a dedicated “Language switcher” element for Polylang, which you can add anywhere on your site and customize without leaving the builder.
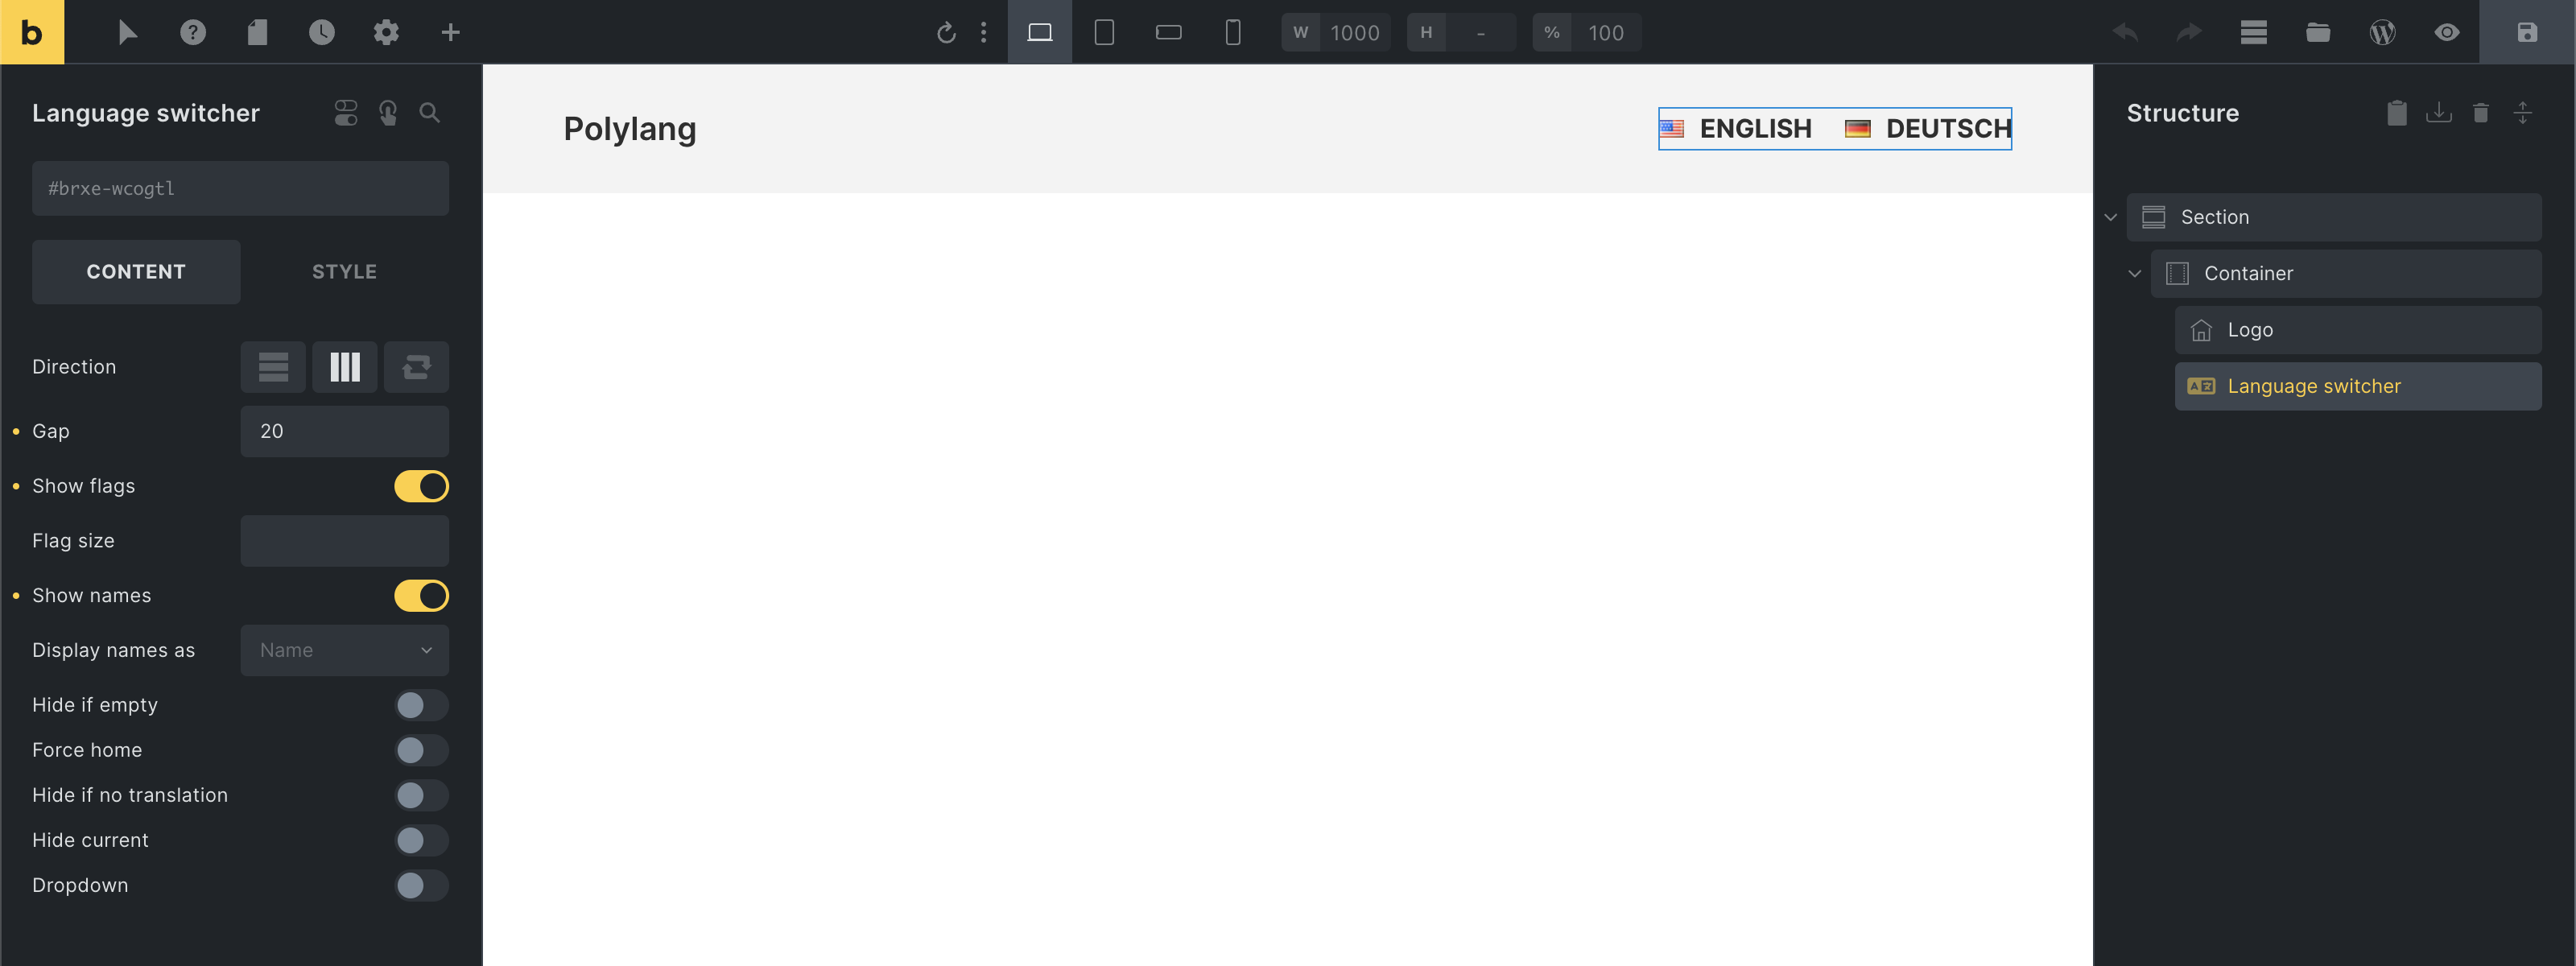
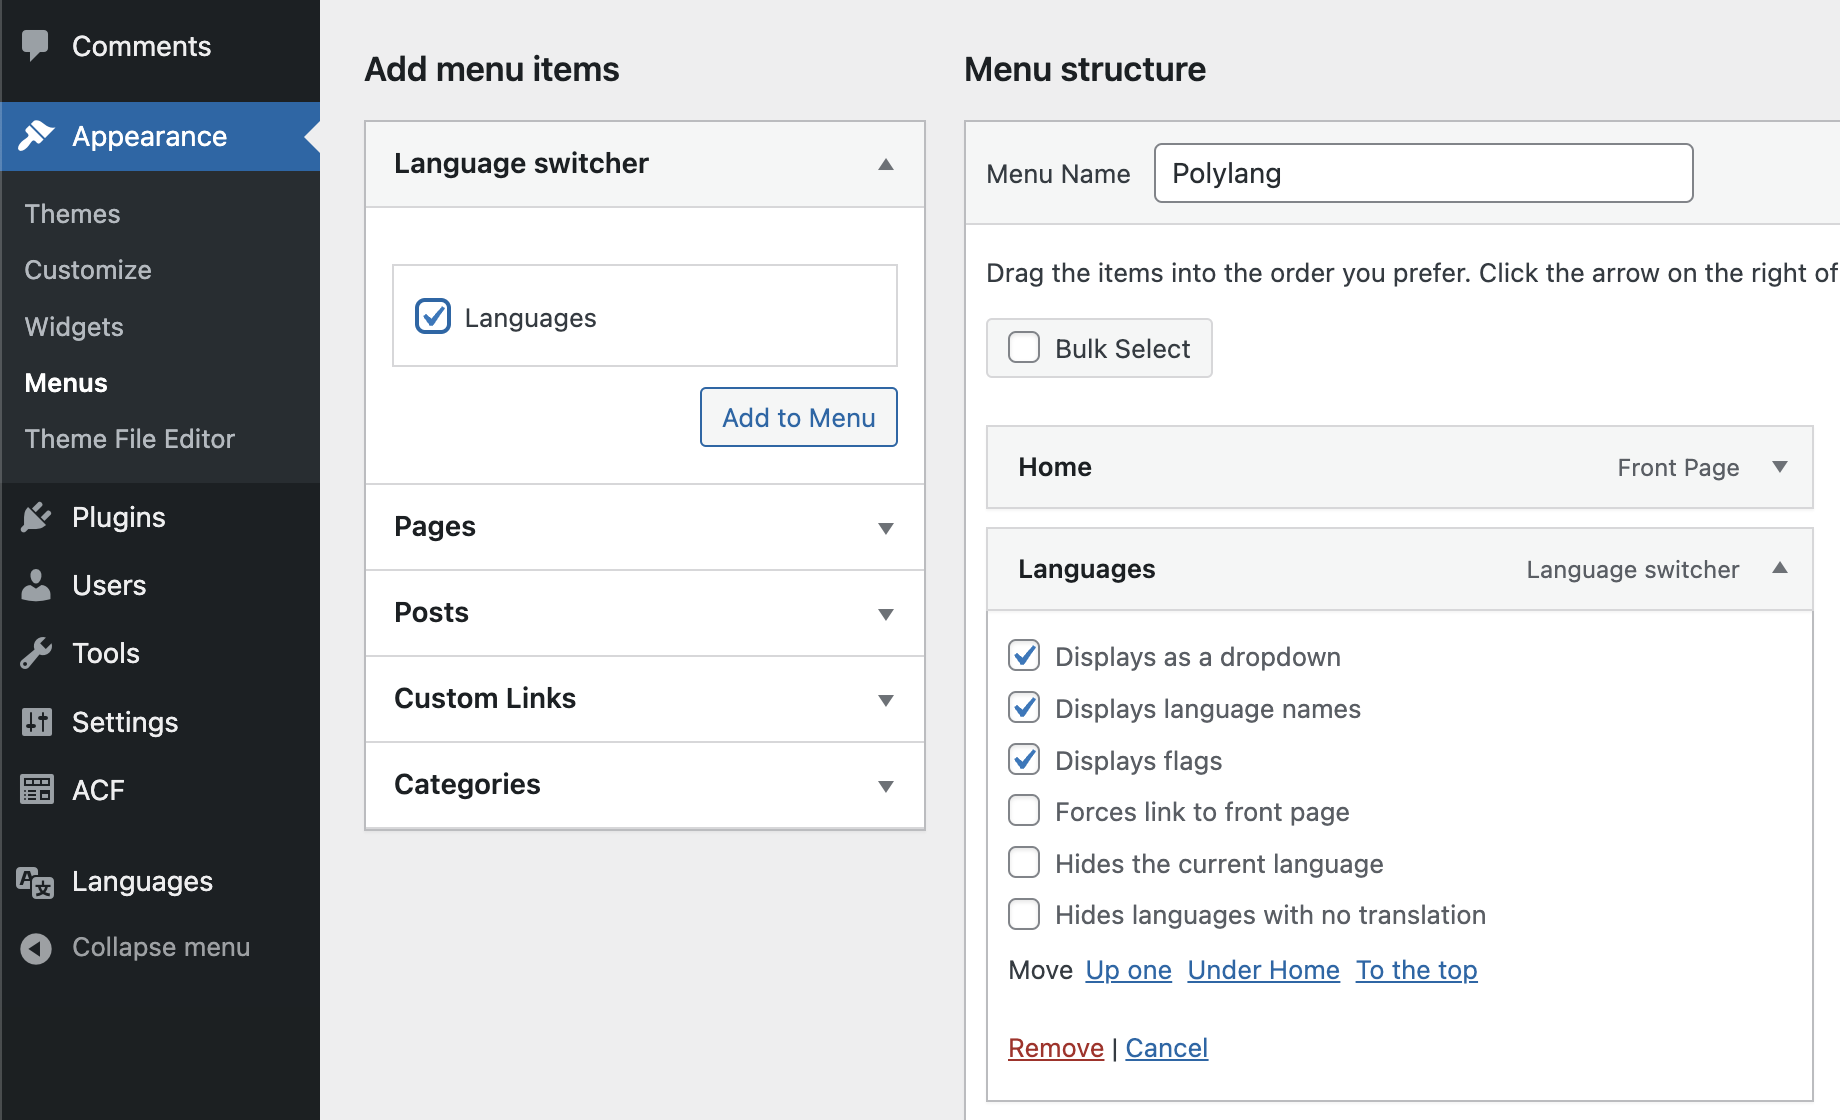
You can also add the language switcher to your WordPress menu by adding the “Language switcher” under Appearance > Menus like this:
Troubleshooting common Polylang issues
Section titled “Troubleshooting common Polylang issues”When integrating Polylang with Bricks, you might encounter some common issues. Here are a few possible problems and suggested solutions:
1. Templates don’t show after Polylang activation
Section titled “1. Templates don’t show after Polylang activation”If you have Bricks templates that don’t appear after activating Polylang, this might be due to language settings. Ensure each of your templates is assigned a language. This setting is found on the right side of the WordPress editor page under “Languages”. Remember to update your template after assigning a language.
2. Untranslated templates do not appear
Section titled “2. Untranslated templates do not appear”When an untranslated Bricks template doesn’t appear, it might be due to a language discrepancy between the page and the template. If a Bricks page uses a template that isn’t translated into that page’s language, the template won’t show. To fix this, translate your templates into all languages your pages use.
3. Incorrect language in menus
Section titled “3. Incorrect language in menus”If a menu appears in the wrong language, double-check that you’ve assigned the correct language to each of your menus, as per the Managing multilingual menus section above. Remember, Polylang requires a separate menu for each language on your site.
4. Incorrect language query results in Archive or Search template
Section titled “4. Incorrect language query results in Archive or Search template”Please ensure all archive or search templates have enabled Is main query on the main query loop.
Additional resources
Section titled “Additional resources”To learn more about Polylang and its various features, you can refer to the following resources from Polylang’s official documentation:
- Getting Started with Polylang: This guide covers the basics of setting up and using Polylang on your WordPress site.
- Polylang FAQ: Here you’ll find answers to commonly asked questions about using Polylang.
- Polylang advanced: This section provides more advanced Polylang guides.
These resources can provide additional insights and answers to more specific or complex issues you might encounter when using Polylang.
Was this helpful?
A quick vote and short notes help us improve these docs faster.
Leave a note for us
Please do not include passwords, license keys, or personal data. We store submitted notes to improve the docs.
Thanks for sharing feedback. We're using it to improve these docs.