Element Conditions
Element Conditions let you define one or multiple conditions for any element. Only if those conditions are met is the element rendered on the front end.
Conditions are validated server-side and are meant to filter out/not load an element based on data (post, user, dynamic data, date & time, etc.).
Not rendering an element means the element HTML doesn’t exist in the source code.
This is perfect for restricting content to logged-in users or users with a specific role (e.g., membership sites) to hide time-sensitive information according to a certain weekday/date/time, according to dynamic data, etc.
Element conditions are display logic. They are useful for hiding interface, marketing, membership, or product-state content, but they are not a replacement for server-side permissions around truly sensitive data, downloads, or actions.
If you need full programmatic power to define your element conditions, use the bricks/element/render Bricks filter.
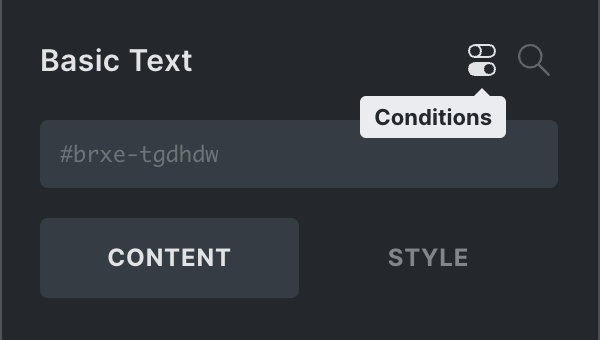
Accessing conditions
Section titled “Accessing conditions”When editing an element, click the “Conditions” (toggle) icon in the panel header to open/close the element conditions interface. You’ll see the “Conditions” toggle icon in the structure panel if an element has conditions. Click the icon to jump right into the conditions interface for this element.
How element conditions work
Section titled “How element conditions work”At least one set of conditions must be fulfilled to render the element. This means all conditions inside a condition “set” must be evaluated to be true.
So there is an OR relationship between condition sets and an AND relationship between conditions inside a set.
To add your first set of conditions, click the ”+” icon next to the “Conditions” title:
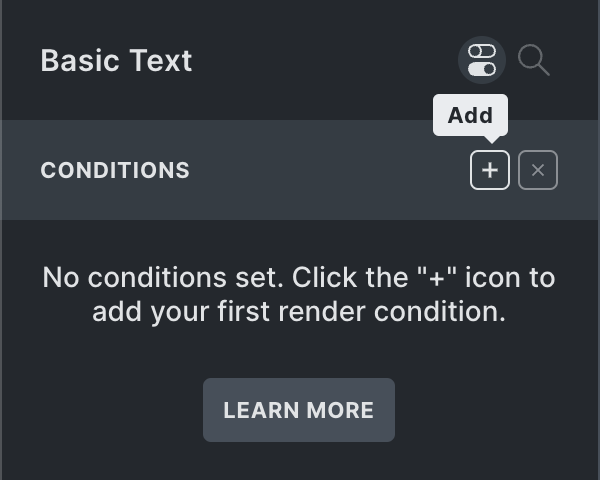
We now have one set with one condition. Every condition consists of the following three properties:
- Key (post ID, user role, date, dynamic data, etc.)
- Comparison operand (==, !=, >, <, contains, before, after, etc.)
- Value (numeric, text, checkbox, select option(s), etc.)
Built-in condition groups include:
- Post: post ID, title, parent, status, author, date, and featured image.
- User: login state, user ID, registration date, and role.
- Date & time: weekday, date, time, and datetime. These use the WordPress site timezone.
- WooCommerce: product type, sale/new/stock states, stock quantity, stock management, sold individually, purchased by current user, featured status, rating, product categories, and product tags. This group is available when WooCommerce is active.
- Other: dynamic data, browser, operating system, current URL, and referrer URL.
The Current URL condition includes query parameters. Browser, operating system, and referrer checks depend on request headers, so treat them as convenience targeting rules rather than trusted security checks.
Let’s say we want to show an element only to logged-in users. We’d create the following condition:
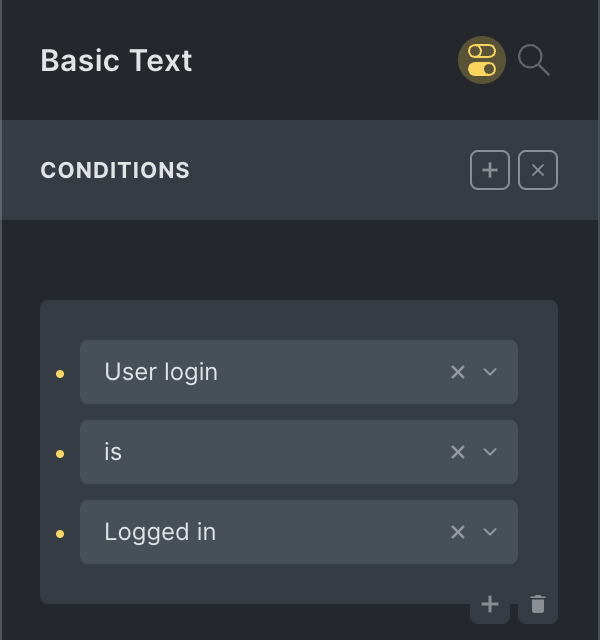
This element is only rendered when the person viewing this page is logged in.
Non-logged-in guests, bots, crawlers, etc., will not be able to see this element (as it’s not in the source code).
Conditions indicator
Section titled “Conditions indicator”Notice the highlighted “Conditions” icon in the screenshot above. It’s a great indicator to see at a glance if the element you are editing has any conditions (without having to open the conditions interface).
The “Conditions” (toggle) icon is also visible next to an element in the structure panel to quickly scan for element conditions on your page. A click on it brings you right into the conditions interface.
Checking multiple conditions
Section titled “Checking multiple conditions”Between a set of conditions exists an OR relation. And conditions within a set have an AND relation.
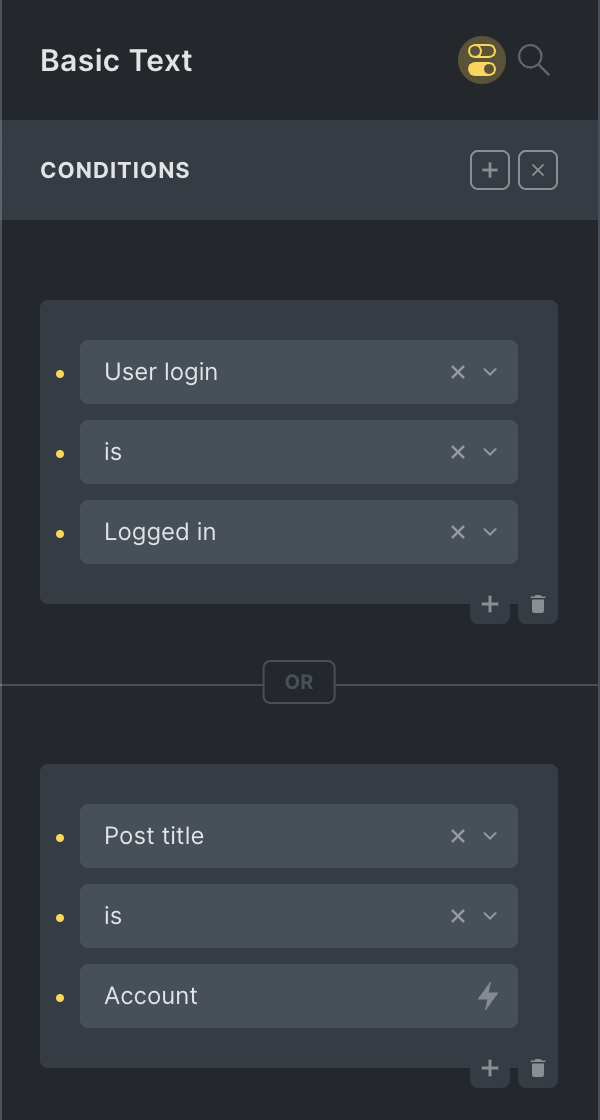
Let’s create a second set of conditions (by clicking the ”+” icon at the top-right again) to illustrate this.
The condition in this new set is fulfilled (true) if the post title is “Account”.
As there is an OR relation between condition sets, the element is rendered if (1) the user is logged in OR (2) the title of the post/page being viewed is “Account”.
Combining AND & OR conditions
Section titled “Combining AND & OR conditions”Let’s extend the conditions for this element by checking if the logged-in user has been registered before the 1st of Jan 2022.
As there is an AND relation between conditions inside a set, click the ”+” button on the bottom-right of the first condition to add another condition to this first set:

You’ll also notice the vertical “AND” label between conditions inside a set.
And the horizontal “OR” label between condition sets.
This visualizes the element conditions logic.
Comparison behavior
Section titled “Comparison behavior”== and != comparisons use PHP-style loose comparison and convert common boolean-like values such as true, false, 1, 0, and empty strings before comparing. Numeric comparisons (>, <, >=, <=) compare the resolved values directly.
For multi-select values such as user roles, post statuses, WooCommerce product categories, and product tags, is matches if any selected value overlaps. is not matches when there is no overlap.
The contains and does not contain comparisons are string checks. Use them for text-like values such as post titles, dynamic data output, URLs, and referrers.
How to compare dynamic data against the value
Section titled “How to compare dynamic data against the value”Certain dynamic data provider fields allow you to specify the value & label (e.g., ACF true false, Metabox checkbox list, radio, select, etc.).
To compare against the value instead, you can use the :value filter like this:
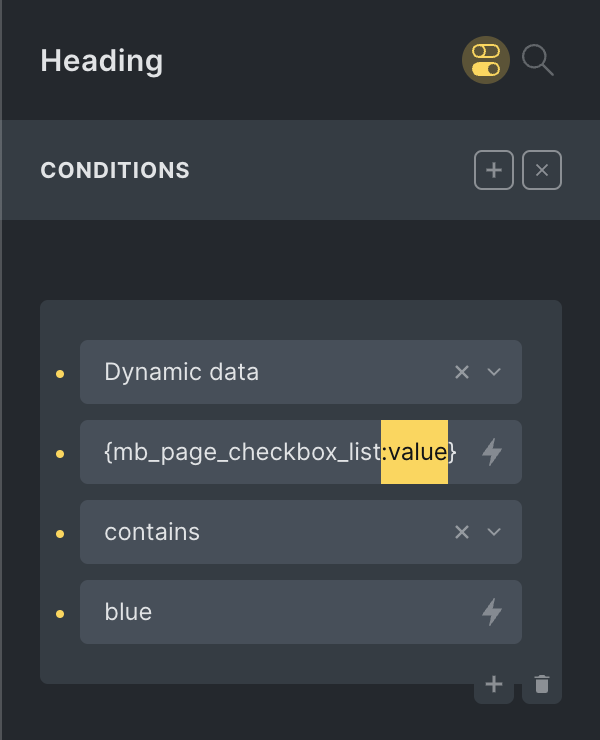
In the example above, the condition is fulfilled when the Metabox checkbox list has the blue value selected. Without the :value filter, the condition would compare against the checkbox option label.
Element Conditions API
Section titled “Element Conditions API”The following information is intended for developers who wish to extend the default element conditions interface programmatically (@since 1.8.4).
The custom element condition should resemble the following example:
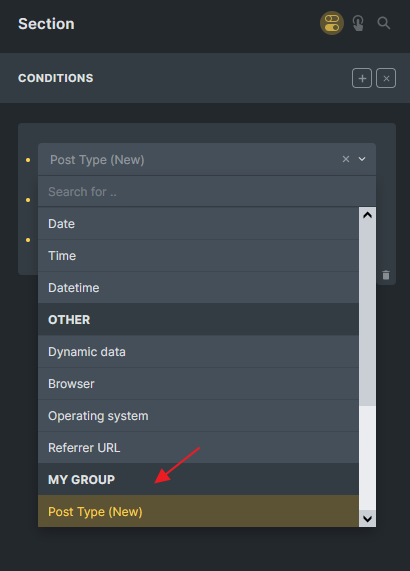
Builder: New condition group with “Post type” option
Step 1: Add condition group via filter: bricks/conditions/groups
Section titled “Step 1: Add condition group via filter: bricks/conditions/groups”add_filter( 'bricks/conditions/groups', 'add_my_condition_group' );function add_my_condition_group( $groups ) { // Ensure your group name is unique (best to prefix it) $groups[] = [ 'name' => 'my_group', 'label' => esc_html__( 'My Group', 'my-plugin' ), ];
return $groups;}Step 2: Add condition options via filter: bricks/conditions/options
Section titled “Step 2: Add condition options via filter: bricks/conditions/options”In this example, create a new condition to compare the current page post type with the user’s value. The compare control is a dropdown with “is” and “is not” options. The value field type is a text input.
add_filter( 'bricks/conditions/options', 'add_my_custom_condition' );function add_my_custom_condition( $options ) {  // Ensure key is unique, and that group exists  $options[] = [    'key'   => 'my_post_type',    'label' => esc_html__( 'Post Type (New)', 'my-plugin' ),    'group' => 'my_group',    'compare' => [      'type'        => 'select',      'options'     =>  [        '==' => esc_html__( 'is', 'my-plugin' ),        '!=' => esc_html__( 'is not', 'my-plugin' ),      ],      'placeholder' => esc_html__( 'is', 'my-plugin' ),    ],    'value'   => [      'type'        => 'text',    ],  ];
  return $options;}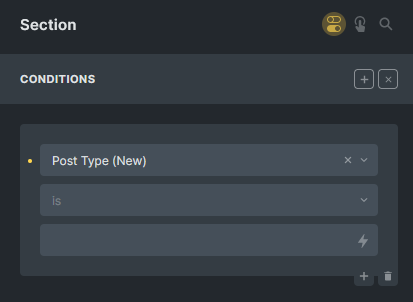
Expected result: New condition in the builder
Step 3: Execute your logic to return a Boolean result via filter: bricks/conditions/result
Section titled “Step 3: Execute your logic to return a Boolean result via filter: bricks/conditions/result”Based on your custom logic, return true or false for your condition. Bricks take care of the OR and AND conditions.
In this example, we check if the current post type matches the user value.
If the condition is met, return true.
You can access the $condition variable, which has been set inside the builder.
add_filter( 'bricks/conditions/result', 'run_my_custom_condition', 10, 3 );function run_my_custom_condition( $result, $condition_key, $condition ) {  // If $condition_key is not 'my_post_type', we return the $render as it is  if ( $condition_key !== 'my_post_type' ) {    return $result;  }
  // Now you can perform your logic by using the $condition variable  // $condition['compare'] is the compare operator, might be empty  // $condition['value'] is the user value, might be empty
  // In my example, if compare is empty, we set it to '==' as default  $compare    = isset( $condition['compare'] ) ? $condition['compare'] : '==';  $user_value = isset( $condition['value'] ) ? $condition['value'] : '';
  $condition_met = false;
  // Get the current post type of the page  $current_post_type = get_post_type();
  switch( $compare ) {    case '==': // "is"      $condition_met = $current_post_type === $user_value;      break;    case '!=': // "is not"      $condition_met = $current_post_type !== $user_value;      break;  }
  return $condition_met;}
If you have added multiple options under the same group, you can target them like this:
add_filter( 'bricks/conditions/result', 'run_my_custom_condition', 10, 3 );function run_my_custom_condition( $result, $condition_key, $condition ) {
  $condition_options = \Bricks\Conditions::$options;  $registered_condition = null;
  foreach ( $condition_options as $option ) {    if ( isset( $option['key'] ) && $option['key'] === $condition_key ) {      $registered_condition = $option;      break;    }  }
  if ( ! $registered_condition || $registered_condition['group'] !== 'my_group' ) {    return $result;  }  // Now you can perform your logic by using the $condition variable  // $condition['compare'] is the compare operator, might be empty  // $condition['value'] is the user value, might be empty
  $condition_met= false;
  switch( $condition_key ) {    case 'my_condition_option_1':      // Example      $condition_met = execute_my_logic_1( $condition );      break;    case 'my_condition_option_2':      // Example      $condition_met = execute_my_logic_2( $condition );      break;  }
  return $condition_met;}
Was this helpful?
A quick vote and short notes help us improve these docs faster.
Leave a note for us
Please do not include passwords, license keys, or personal data. We store submitted notes to improve the docs.
Thanks for sharing feedback. We're using it to improve these docs.