Save Form Submissions
Bricks 1.9.2 introduced the ability to save Form element submissions in your WordPress database. Once enabled globally, each form can use the Save submission action to store entries in a Bricks-managed database table and review them from the WordPress dashboard.
Use this for contact forms, quote requests, event registrations, lead capture, and other workflows where you need a dashboard record in addition to email, webhook, or third-party integrations.
How to enable
Section titled “How to enable”Enable Save form submissions in database under Bricks > Settings > General > Form submissions.
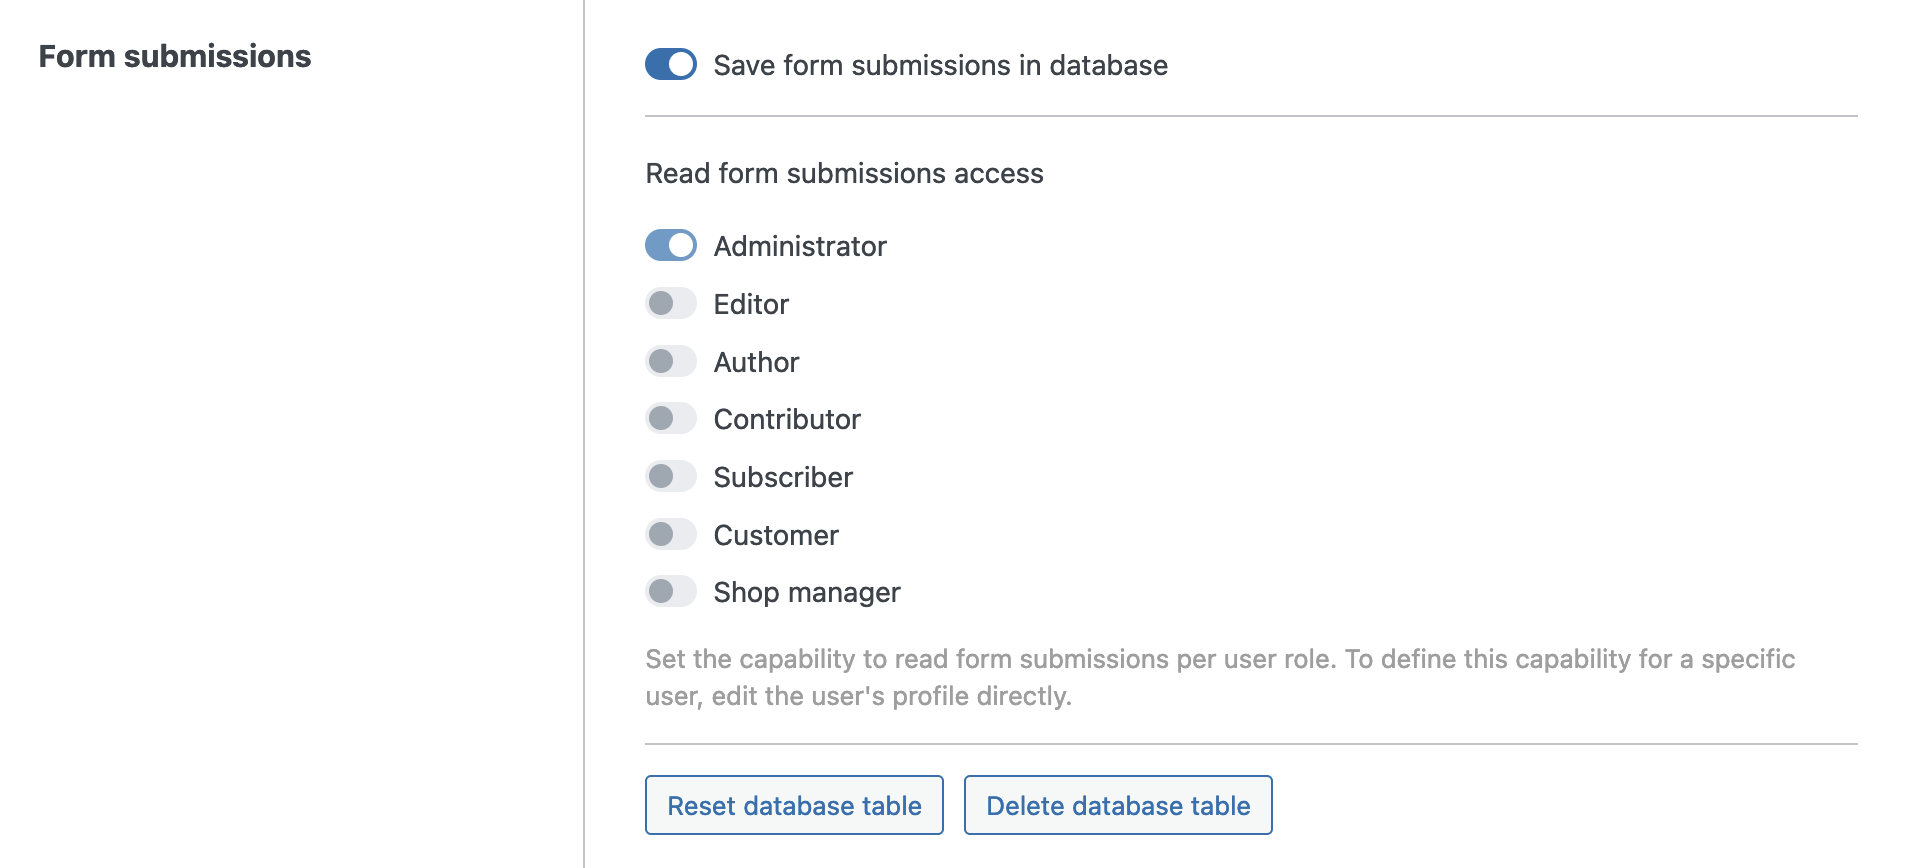
After enabling it, save your settings. Bricks now creates a custom table named bricks_form_submissions in your database (plus your WP database prefix).
You should now also see the following action buttons:
- Reset database table: Removes all saved submission rows from the table.
- Delete database table: Deletes the custom submissions table and disables the global setting.
Form action: Save submission
Section titled “Form action: Save submission”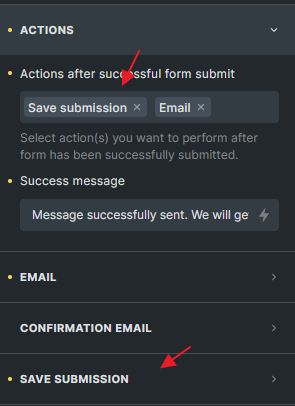
After the global setting is enabled, edit a Form element and select Save submission under the Actions control group.
In the example below, the form uses Save submission and Email.
The sequence of your actions matters. If an action fails, execution of all subsequent form actions is halted. Set the order according to your workflow.
In this example, if Save submission fails, the Email action that follows it will not be triggered.
Bricks always moves the Redirect action to the end of the action list during submission processing.
What Bricks saves
Section titled “What Bricks saves”The saved entry includes the submitted form fields and selected metadata:
- The post ID where the form was submitted from, when available.
- The Form element ID. If the form is a global element, Bricks uses the global element ID.
- The submission date in the database.
- Submitted form field data, stored as JSON.
- Browser and operating system, derived from the user agent.
- Referrer URL, when submitted by the form.
- Logged-in user ID, when the submitter is logged in.
- IP address, only when Save IP address is enabled for that form.
HTML fields and honeypot fields are not saved as submitted form data.
Bricks sanitizes data before inserting it into the database. For example, email fields are sanitized as email addresses, URL fields as URLs, number fields as numbers, textarea values as post-safe HTML, and most other values as text or URLs.
Save submission settings
Section titled “Save submission settings”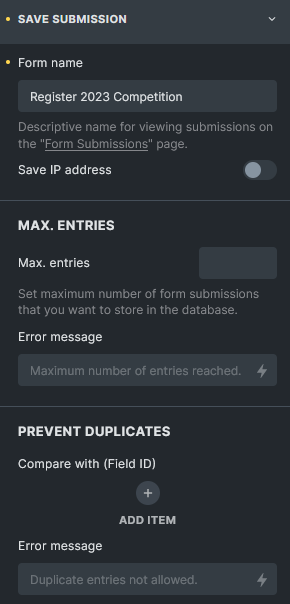
Form name
Section titled “Form name”Give your form a unique and descriptive name. This name is used on the Form Submissions page in the dashboard. If no name is set, Bricks displays the form as [No name] and still identifies it by Form ID.
Save IP address
Section titled “Save IP address”Enable this to save the submitter’s IP address in the submission entry. Only enable it when you have a clear reason to store the IP address and have updated any required privacy notice.
Max. entries
Section titled “Max. entries”Set the maximum number of submissions to store for this form. This is useful for event registration, limited waitlists, and other capacity-based workflows.
When the limit is reached, Bricks returns an error and does not save the new entry. You can customize the error message. Because this is an action error, later actions in the form action list are not executed.
Prevent duplicates
Section titled “Prevent duplicates”You can prevent storing duplicate submissions when matching data already exists for the same form.
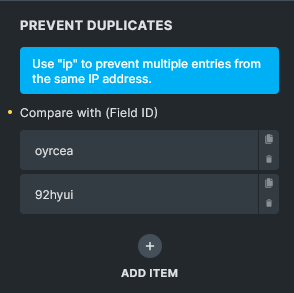
Copy the unique six-character ID of the field you want to check, create a new item under Prevent duplicates, and paste the field ID into Compare with (Field ID).
If Save IP address is enabled, you can use the ip keyword to prevent saving more than one submission from the same IP address.
A submission is considered a duplicate only if all configured duplicate checks match an existing entry for that form. Field values are compared case-insensitively after trimming whitespace.
Submissions flagged as duplicates are not saved. A customizable error message appears, and all subsequent form actions are halted.
Viewing form submissions
Section titled “Viewing form submissions”To view collected submissions, navigate to Bricks > Form Submissions in the WordPress dashboard.
Overview page
Section titled “Overview page”The overview page groups submissions by Form ID and shows each form’s name and entry count. This helps you quickly understand which forms have stored submissions.

The Delete button in each form row deletes all entries for that form.
This action permanently removes all submissions for the selected form, so make sure you have a backup or genuinely intend to delete them.
Individual form submission
Section titled “Individual form submission”Click a form name on the overview page to view all entries for that specific form.
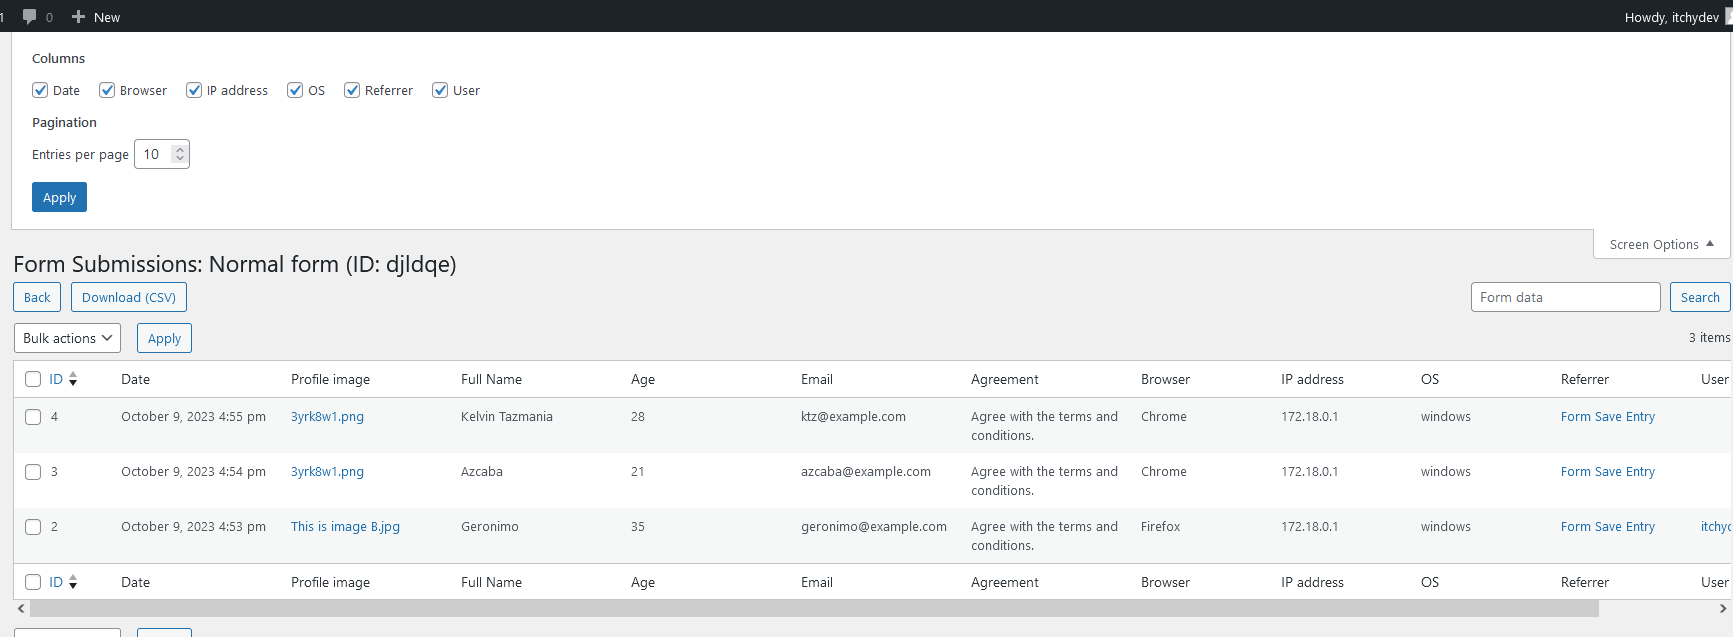
Click Screen options in the top-right corner to toggle metadata columns. Available metadata columns include Date, Browser, IP address, OS, Referrer, and User.
The search box searches the stored form data JSON. It is useful for submitted field values, but it does not search metadata columns such as browser, IP address, OS, referrer, or user.
You can select multiple entries from the list and delete them in bulk. This feature simplifies the process of removing specific submissions, especially if you want to clear out any irrelevant, outdated, or test data.
Click Download (CSV) to export all submissions for the form you are viewing.
CSV exports include the visible submission columns and submitted field values. Bricks prefixes cells that could be interpreted as spreadsheet formulas, helping reduce CSV formula-injection risk when exported files are opened in spreadsheet software.
Form submission access
Section titled “Form submission access”Bricks 1.11 introduces more granular control over who can view form submissions on your site. With the new bricks_form_submission_access capability, you can specify which user roles or individual users have permission to access form submissions.
Administrators have form submission access by default and cannot be disabled in the role list.
User role access
Section titled “User role access”To configure role-based access:
- Navigate to Bricks > Settings > General > Form submissions.
- Under Form submission access, you will see checkboxes for available user roles such as Administrator, Editor, Author, and Contributor.
The Administrator role is always enabled by default and cannot be disabled. For other roles, check or uncheck the boxes to grant or revoke access to form submissions.
This allows you to easily control who on your team can view form submissions based on their user role.
Individual user access
Section titled “Individual user access”To configure access on an individual user level:
- From the WordPress dashboard, go to Users.
- Click to edit a specific user’s profile.
- In the user profile, find and adjust the Form submission access setting.
This lets you manage form submissions access for specific users, overriding the broader role-based settings if needed.
Users with form submission access but without broader Bricks admin access can still get a limited Bricks - Form Submissions admin menu when submissions are enabled.
Only users who can manage options can reset or delete the whole submissions table, delete all entries for a form from the overview, or delete selected entries in bulk.
Developer notes
Section titled “Developer notes”Before saving, Bricks passes the form data through the bricks/form/save-submission/form_data filter. Use this if you need to normalize, remove, or add stored fields before the database insert.
For file fields, the Form Submissions table can link to files saved in the Media Library, the uploads directory, or a custom directory. The file URL used in the submissions table can be adjusted with the bricks/form/submission-table/file_url filter.
Was this helpful?
A quick vote and short notes help us improve these docs faster.
Leave a note for us
Please do not include passwords, license keys, or personal data. We store submitted notes to improve the docs.
Thanks for sharing feedback. We're using it to improve these docs.