WooCommerce Builder
WooCommerce is a free plugin to manage the e-commerce functionality of your WordPress site. It is the world’s most popular open-source solution to create and manage a shop on the Internet, and therefore Bricks proudly integrates with it.
Bricks introduces the new in-theme WooCommerce Builder, which allows you to build your entire store with it. Including the main shop page, single product page, products archives, cart, checkout, and account pages.
To design these layouts, Bricks offers WooCommerce-specific elements and template types.
Starting in Bricks 2.4, Cart, Checkout, and My Account can also use the advanced modular workflow. This workflow lets you edit multiple WooCommerce page states directly on the assigned WooCommerce page with Cart v2, Checkout v2, and Account Page v2.
Use the Woo Setup Wizard to review the current WooCommerce setup and create or repair classic and v2 WooCommerce layouts from guided presets.
Certain elements only show when editing a specific template type.
The Checkout customer details element, for example, is only available when editing the WooCommerce Checkout template.
Getting Started
Section titled “Getting Started”To access the WooCommerce Builder in Bricks, install and activate the free WooCommerce plugin available in the official WordPress repository or through your WordPress dashboard under Plugins → Add New.
After activation, you might want to set up the store using the in-site configuration wizard or do it manually through the WooCommerce settings menus.
Please note that during the configuration wizard, you won’t need to pick up a new theme because Bricks is already a theme and fully supports WooCommerce.
With the configuration done and after adding some products, you can start visually building your WooCommerce layouts with Bricks.
WooCommerce Templates
Section titled “WooCommerce Templates”With WooCommerce activated, you can visually create and style the following WooCommerce templates in Bricks:
Use the WooCommerce advanced modular elements workflow when you want Cart, Checkout, and My Account states in one editable page instead of separate templates. The classic template workflow remains supported for existing stores and for projects that prefer separate template parts.
| Template Type | Description |
|---|---|
| Single product | Individual product page. |
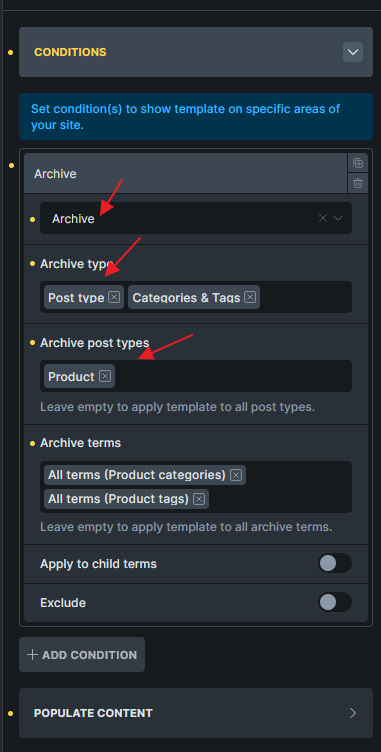
| Product archive | Archive pages like product categories, tags, attributes, etc. Set visibility via Template Conditions. |
| Cart | The cart (when it contains products). |
| Empty cart | The empty cart (when it doesn’t contain any products). |
| Checkout | Checkout screen where the customer enters billing & shipping details and selects the payment method. |
| Pay | Checkout screen where the customer enters the payment details. |
| Thank you | Displayed after successful checkout completion. |
| Order receipt | Displayed when viewing the order receipt. |
| Account login | Displayed when viewing the My Account page not logged in. |
| Account lost password | Displayed when viewing the lost password My Account page. |
| Account lost password (confirmation) | Displayed after submitting the lost password form. |
| Account reset password | Displayed after clicking the link in the password reset email. |
| Account dashboard | Displayed when viewing the My account page logged in. |
| Account orders | Displayed when viewing the “Orders” tab of the My Account page. |
| Account view order | Displayed when viewing an individual order. |
| Account downloads | Displayed when viewing the “Downloads” tab of the My Account page. |
| Account payment methods | Displayed when viewing saved payment methods. |
| Account add payment method | Displayed when adding a new payment method. |
| Account addresses | Displayed when viewing the “Addresses” tab of the My Account page. |
| Account edit address | Displayed when editing the billing or shipping address on the My Account page. |
| Account edit account | Displayed when editing the account details on the My Account page. |
My Account builder
Section titled “My Account builder”Starting at Bricks 1.9, you can also visually design your Account page. Including the login/registration, lost & reset password pages.
For account-specific template behavior, see WooCommerce Account Builder.
Shop page
Section titled “Shop page”The shop page is a special WooCommerce page which is defined as the archive page for your products.
To design a unique Shop page layout, you can directly edit the Shop page with Bricks.
Or you could add a template condition in your WooCommerce - Product Archive template so this template is used for the Shop page as well. Since shop page is the archive for the product post type, just set it like this.
WooCommerce elements
Section titled “WooCommerce elements”Bricks aims to provide the most flexible approach to the visual design of the WooCommerce templates without losing the functionality & hooks WooCommerce already provides that many third-party WooCommerce plugins/extensions rely upon.
Among the general WooCommerce elements and Products element, Bricks has special elements for specific WooCommerce template types like the cart or the checkout.
More than 30 WooCommerce-specific elements in total are available to design your WooCommerce templates & pages with Bricks.
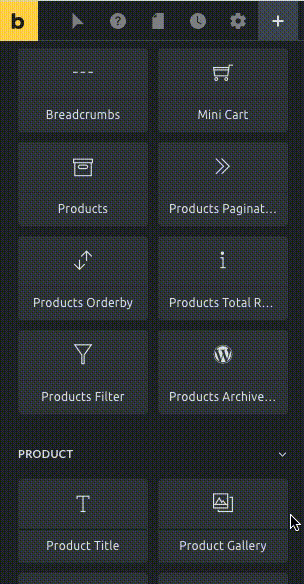
These are some of the WooCommerce-specific elements:
- Add to cart
- Product title
- Product gallery
- Product price
- Product stock
- Product meta
- Product rating
- Product reviews
- Product content
- Product short description
- Product additional information
- Product tabs
- Product up/cross-sells
- Related products
Dynamic Data
Section titled “Dynamic Data”The WooCommerce integration adds new dynamic data tags to target product and order properties.
Bricks 2.4 also adds v2 WooCommerce tags for cart totals, checkout steps, WooCommerce URLs, account addresses, order data, downloads, and customer notes. See the full WooCommerce v2 query loops and dynamic tags reference.
{woo_product_price} - Returns the full product price with currency and HTML
{woo_product_regular_price} - Returns the product regular price with currency and HTML
{woo_product_sale_price} - Returns the product sale price with currency and HTML. If no sale price set, empty string will be returned.
{woo_product_regular_price:plain} - Returns product regular price with currency without HTML
{woo_product_regular_price:value} - Returns product regular price as simple string (e.g: 65.3, 2.5, 5)
{woo_product_cat_image} - Renders the product category image
{woo_product_images} - Renders the product featured image and product gallery images. Can use on Carousel and Image gallery element. You can also use :value filter to output the gallery images IDs in comma separated format. (@since 1.11)
{woo_product_gallery_images} - Renders the product gallery images (excluded the product featured image). Can use on Carousel and Image gallery element. You can also use :value filter to output the gallery images IDs in comma separated format. (@since 1.11)
{woo_add_to_cart} - Renders the add to cart button
{woo_product_on_sale} - Renders the on-sale badge if the product is on sale
{woo_product_rating} - Renders the product rating
{woo_product_rating:plain} - Outputs the product rating in text form. Ex: Rated 5.00 out of 5
{woo_product_rating:format} - Outputs the product rating even if no rating has been submitted yet
{woo_product_sku} - Returns the product SKU. Can be used on single product pages and inside a custom Cart Contents loop. Cart Contents loop support was added in Bricks 2.4.
{woo_product_gtin} - Returns the product GTIN (Global Trade Item Number) from the WooCommerce global unique ID field. Can be used on single product pages and inside a custom Cart Contents loop. By default, the value is wrapped in a span.gtin; append the :value filter to output the plain text value. (@since 2.4)
{woo_product_gtin} - Returns the product GTIN when supported by the installed WooCommerce version
{woo_product_excerpt} - Renders the product short description
{woo_product_stock} - Renders the product stock (append value filter outputs number of products in stock)
{woo_product_stock_status} - Outputs instock, outofstock, or onbackorder (Useful for element conditions)
{woo_product_badge_new} - Renders “New” span with classes .badge.new if condition met. (@since 1.11.1) (Bricks Settings > WooCommerce > Products.)
{woo_product_badge_new:plain} - Renders “New” text only if condition met. (@since 1.11.1) (Bricks Settings > WooCommerce > Products.)
{woo_product_type} - Returns the WooCommerce product type.
Inside a Cart Contents query loop, you can also use cart-specific tags:
{woo_cart_product_name} - Renders the cart product name with a link.
{woo_cart_remove_link} - Renders the cart item remove link.
{woo_cart_quantity} - Renders the cart quantity input.
{woo_cart_subtotal} - Renders the cart item subtotal.
{woo_cart_update} - Renders the update cart button.
On checkout thank you and order receipt templates, Bricks also supports order tags:
{woo_order_id} - Returns the order ID.
{woo_order_number} - Returns the order number.
{woo_order_date} - Returns the order date.
{woo_order_total} - Returns the order total.
{woo_order_payment_title} - Returns the order payment method.
{woo_order_email} - Returns the order email.
You can use the basic dynamic tags as well.
{post_id} - Outputs the product ID
{post_title:link} - Renders the product title with link
{post_terms_product_cat} - Renders the product categories with links
{post_terms_product_cat:plain} - Renders the product categories without links)
WooCommerce v2 dynamic data
Section titled “WooCommerce v2 dynamic data”When advanced modular elements are enabled, Bricks adds WooCommerce dynamic tags for:
- Cart totals, applied coupons, applied fees, taxes, shipping totals, and free shipping progress.
- Checkout step data and WooCommerce page/endpoint URLs.
- Account addresses and account edit-address state data.
- Order details, order items, order totals, order actions, downloads, and customer notes.
Most of these tags depend on a v2 page state or query loop context. For example, {woo_order_item_name} belongs inside an wooOrderItems loop, while {woo_cart_applied_coupon} belongs inside a wooCartCoupons loop.
Bricks Settings: WooCommerce
Section titled “Bricks Settings: WooCommerce”You’ll find a dedicated tab for the WooCommerce integration in your WordPress dashboard under “Bricks > Settings > WooCommerce”.

- Disable WooCommerce Builder - This toggle disables the Bricks’ WooCommerce integration.
- Enable Bricks WooCommerce “Notice” element - Removes native WooCommerce notice output so you can place the Notice element manually.
- Enable Bricks WooCommerce “Checkout coupon” element - Removes the native checkout coupon form and lets you place the Checkout Coupon element manually. WooCommerce Enable the use of coupon codes must be active under WooCommerce > Settings > General.
- Enable Bricks WooCommerce “Checkout login” element - Removes the native checkout login form and lets you place the Checkout Login element manually. WooCommerce Enable log-in during checkout must be active under WooCommerce > Settings > Accounts & Privacy.
- Show quantity input field in product loop - Shows quantity inputs for purchasable simple products that are in stock.
- Enable product variation swatches - Converts variation dropdowns to color, image, or label swatches on the Add to cart element.
- Product Badge “Sale” - Choose between not showing the on-sale badge, showing the “Sale” badge, or the discount percentage.
- Product Badge “New” - Show a “New” badge if the product was published in less than the .. days configured.
- Disable Product Gallery Zoom/Lightbox - Disable the product gallery zoom or lightbox scripts.
- Enable AJAX add to cart - Enables Bricks’ AJAX add to cart behavior for purchasable, in-stock simple products and product variations in product loops when they support
ajax_add_to_cart. - AJAX add to cart texts and notices - Customize the adding/added button text, reset delay, “View cart” button visibility, notice output, and scroll-to-notice behavior.
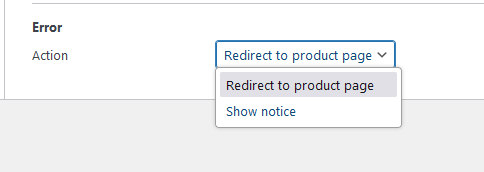
- AJAX add to cart Error action - Select either “Redirect to product page” or “Show notice” when an error occurs during the AJAX add to cart process. You can also scroll to the notice when “Show notice” is selected. (@since 1.11)
Theme Styles
Section titled “Theme Styles”When WooCommerce is active, you’ll find the following control groups in the Theme Styles panel:
- WooCommerce - Button
- WooCommerce - Notice
WooCommerce Products Query Loop
Section titled “WooCommerce Products Query Loop”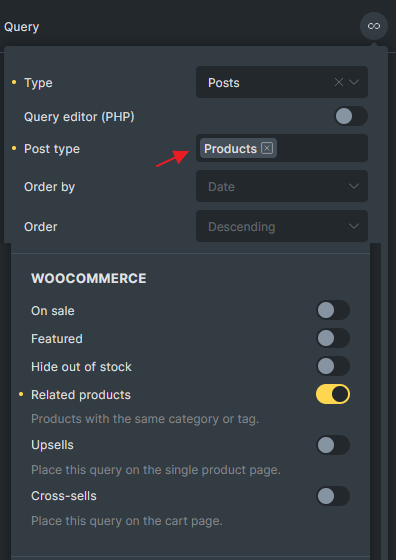
You can use these checkboxes under WooCommerce section to easily retrieve WooCommerce products. Please select the “Products” post type; otherwise, the WooCommerce section will be hidden. (@since 1.10)
Check this article for more examples.
Bricks 2.4 adds v2 WooCommerce query loops for cart coupons, fees, taxes, orders, order items, downloads, customer notes, account orders, account order actions, account downloads, and account addresses. See WooCommerce v2 query loops and dynamic tags for the complete list.
Was this helpful?
A quick vote and short notes help us improve these docs faster.
Leave a note for us
Please do not include passwords, license keys, or personal data. We store submitted notes to improve the docs.
Thanks for sharing feedback. We're using it to improve these docs.