
Checkout v2 multistep checkout
Checkout v2 can split the WooCommerce checkout form into multiple editable steps while keeping the native WooCommerce checkout form and submission flow in place.
Use this workflow when you want a guided checkout experience with separate sections for account login, customer details, shipping, extras, order review, and payment.
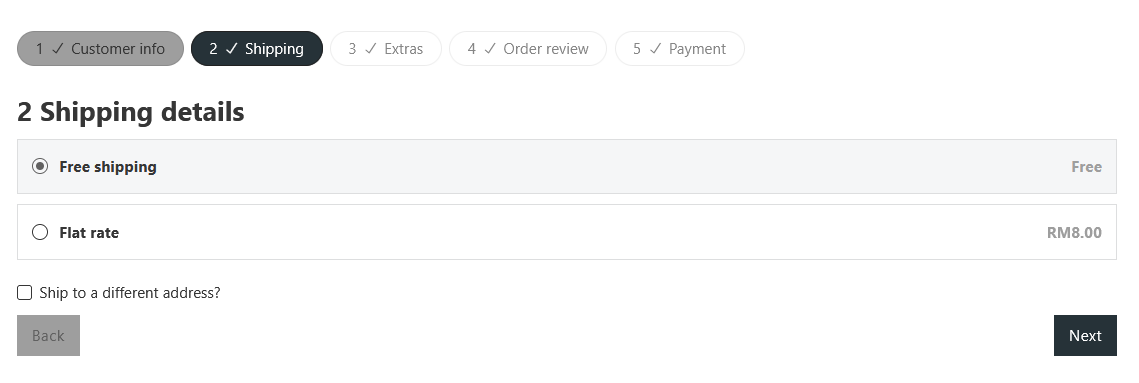
Create a multistep checkout
Section titled “Create a multistep checkout”You can create a multistep Checkout v2 layout in either of these ways:
- Go to Woo Setup Wizard, choose the Checkout area, then select Advanced multistep (v2).
- Edit the assigned Checkout page with Bricks, select the Checkout v2 Checkout state, choose Complete checkout under Insert a structure, enable Generate as multistep, then click Generate.
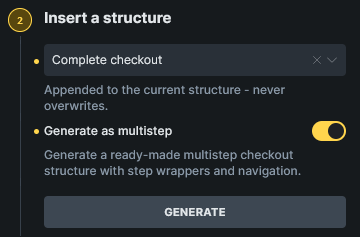
The generated structure adds the checkout form sections, checkout step wrappers, step navigation, and next/back interactions for a complete starter flow.
Generated structure
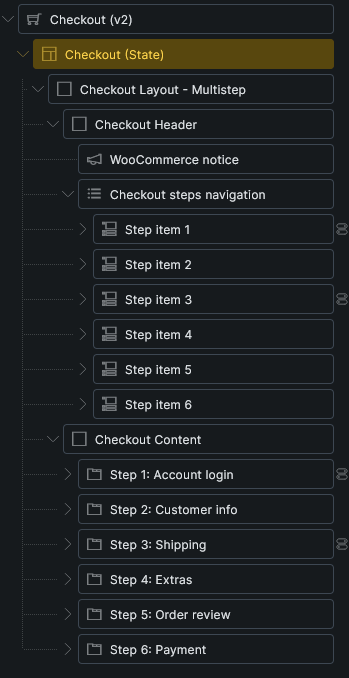
Section titled “Generated structure”A multistep checkout uses these generated support elements:
- Checkout steps navigation: Displays the step navigation list.
- Checkout step nav item: One navigation item inside the steps navigation.
- Checkout step: Wraps the content for one checkout step.
- Checkout account fields, Checkout billing address, Checkout shipping address, Payment options, Place order, and other generated checkout support elements.
Some of these support elements are generated-only or context-specific. If you do not see them in the regular Elements panel, create them through Insert a structure instead. After generation, you can select, style, move, and edit them in the Structure panel like other Bricks elements.
Step order and navigation
Section titled “Step order and navigation”Checkout step order follows the order of the Checkout step elements in the Structure panel. The first step is the initial step.
Navigation items mirror the checkout steps by order. If a checkout step is conditional, add the same condition to the matching navigation item so the visible navigation and visible steps stay aligned.
For the Shipping step, use Checkout : Needs shipping with a value of Yes on both the step and its navigation item. Use Checkout : Needs shipping address only on the Ship to another address control and shipping-address fields. A cart can still require shipping methods when WooCommerce is set to use the billing address for shipping.
Newly generated complete checkout structures include these conditions. If the layout was generated earlier or customized, review the Shipping step, navigation item, and address-field conditions manually because preset changes do not rewrite existing page content.
Each Checkout step has these controls:
- Step ID: Used by navigation, interactions, and direct step jumps.
- Step label: Used as the step label.
- Allow direct entry: Lets the customer jump to this step even if previous steps have not been reached.
- Validate before leave: Requires the current step to pass checkout field validation before moving forward.
- Auto focus first field: Focuses the first available field when the step becomes active.
Use stable, readable step IDs such as customer-info, shipping, order-review, or payment when you plan to target a step with interactions.
Account Login step visibility
Section titled “Account Login step visibility”The generated complete multistep structure adds Checkout : Login step needed conditions to the Account Login navigation item, the Account Login step, and the Customer info Back button.
- Logged-out customer and Enable log-in during checkout enabled: Account Login is the first step, and Customer info includes a Back button.
- Logged-out customer and Enable log-in during checkout disabled: Account Login is not rendered. Customer info becomes the first step and has no Back button.
- Logged-in customer: Account Login and the Customer info Back button are not rendered.
If you build a custom multistep structure, apply the same Checkout : Login step needed condition to all three elements. Keeping the navigation item, step, and Back button under the same condition prevents an empty first step or a Back button with no previous step.
Account creation fields follow the WooCommerce checkout settings separately from the Account Login step. See Checkout v2 account creation.
Step buttons and interactions
Section titled “Step buttons and interactions”Generated multistep layouts use regular Bricks buttons with the Checkout step interaction action.
The action can:
- Move to the next step.
- Move to the previous step.
- Go to a specific step by Step ID.
- Go to a specific checkout field by field key or field ID, such as
billing_postcode. - Scroll the target step or field into view.
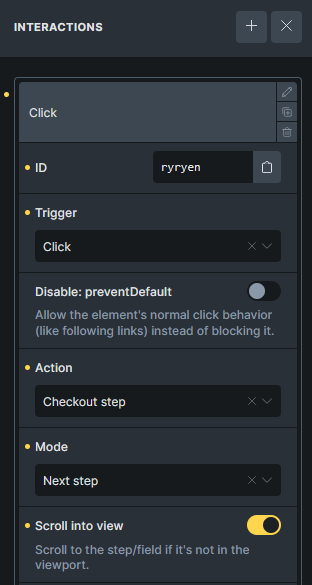
Use the Bricks checkout step changed interaction trigger when you need to run another action after the active checkout step changes.
Step numbers
Section titled “Step numbers”For the navigation element, enable Show step number on Checkout steps navigation to render step numbers with CSS.
Inside custom headings or labels, use {woo_checkout_current_step_number} to output the current step number dynamically.
Validation
Section titled “Validation”Enable Validate before leave on a Checkout step when the customer must complete required fields before moving forward.
Backward navigation is always allowed. Forward navigation checks the current step only when Validate before leave is enabled.
Free orders do not require a payment method selection. Required terms still apply, and orders that require payment must have a selected payment method.
WooCommerce notices can still link to invalid fields. The checkout step script can route the customer to the step that contains the field and focus it.
Payment section for free orders
Section titled “Payment section for free orders”The generated Payment Options wrapper uses brx-woo-payment-section to hide the payment heading and methods when the cart does not require payment. If this class is missing from an existing or custom layout, add it manually under Style > CSS > CSS classes on that wrapper, without a leading dot.
Keep the terms checkbox, step buttons, and Place order controls outside the wrapper. Apply the class to the payment section inside the Checkout step, rather than the entire step. See Checkout v2 payment section for free orders for the full steps.
Recommended review
Section titled “Recommended review”After generating the multistep layout:
- Test the checkout as a guest and as a logged-in customer.
- Test with Enable log-in during checkout both enabled and disabled.
- Test optional and required account creation with WooCommerce username and password generation enabled and disabled.
- Test products that require shipping and products that do not require shipping.
- Review conditional steps, such as account login and shipping.
- Confirm the final payment step contains the payment options, terms, and place order button.
- Test a zero-total order, then change shipping or remove a coupon so payment is required. Confirm the payment section reappears and the terms and Place order controls stay available in both cases.
- Test required field validation and WooCommerce notices.
- Review mobile spacing for the step navigation and buttons.
Related docs
Section titled “Related docs”Was this helpful?
A quick vote and short notes help us improve these docs faster.
Leave a note for us
Please do not include passwords, license keys, or personal data. We store submitted notes to improve the docs.
Thanks for sharing feedback. We're using it to improve these docs.